Knowing how to tape the top of a hockey stick is essential for maximizing control, comfort, and puck handling. The top or butt end of your stick requires proper taping technique to create a functional knob that prevents the stick from slipping out of your hands during play. This comprehensive guide covers everything from basic knob creation to advanced grip rib techniques used by professional players in the NHL during the 2025-2026 season, ensuring you get the most out of your equipment on the ice.
Why Tape the Top of Your Hockey Stick
Taping the top of your hockey stick serves multiple critical functions that directly impact your performance on the ice. The primary purpose is creating a knob that acts as a physical barrier, preventing your top hand from sliding off during stick handling, shooting, and battling for pucks. Without proper taping, players experience reduced control and increased fatigue from constantly readjusting their grip position throughout the game.
The tape job at the butt end also provides customizable grip texture that matches your personal preference and playing style. Players in the United States hockey programs, from youth leagues to professional teams, understand that a well-taped knob can mean the difference between maintaining possession and losing the puck during crucial moments. Additionally, the tape protects the end cap of your stick from wear and damage, extending the overall lifespan of your equipment investment.
Essential Materials for Taping Hockey Stick Tops
Before learning how to tape the top of a hockey stick, you need the right materials. The most common choice is standard cloth hockey tape, typically available in 1-inch or 1.5-inch widths. Black and white are traditional colors, but as of 2026, players in United States hockey markets can find tape in dozens of colors and patterns to match team uniforms or personal preferences.
Premium options include grip-enhanced tape with textured surfaces that provide extra traction even when wet from ice spray or sweat. Many professional players now use specialized butt end tape that’s slightly thicker than standard blade tape, providing more cushioning and a faster knob build. You’ll also want scissors or a tape cutter for clean finishes, and some players keep a lighter handy to seal tape edges and prevent unraveling during games.
Basic Hockey Stick Knob Taping Technique
The fundamental method for taping the top of your hockey stick begins with creating a solid knob at the butt end. Start by placing your thumb over the end cap and wrapping the tape around it several times, moving upward about half an inch with each rotation. Apply firm, consistent tension as you wrap to ensure the tape adheres properly and creates a uniform knob without loose spots or air pockets.
After creating the initial knob base, typically 5-8 wraps depending on your preferred size, continue wrapping downward over the top portion of your original wraps. This creates a tapered, mushroom-shaped knob that’s comfortable against your palm while preventing slippage. Most players in United States hockey programs create knobs between 1 to 2 inches in length, though size preference varies based on hand size and playing position.
Advanced Knob Styles and Variations
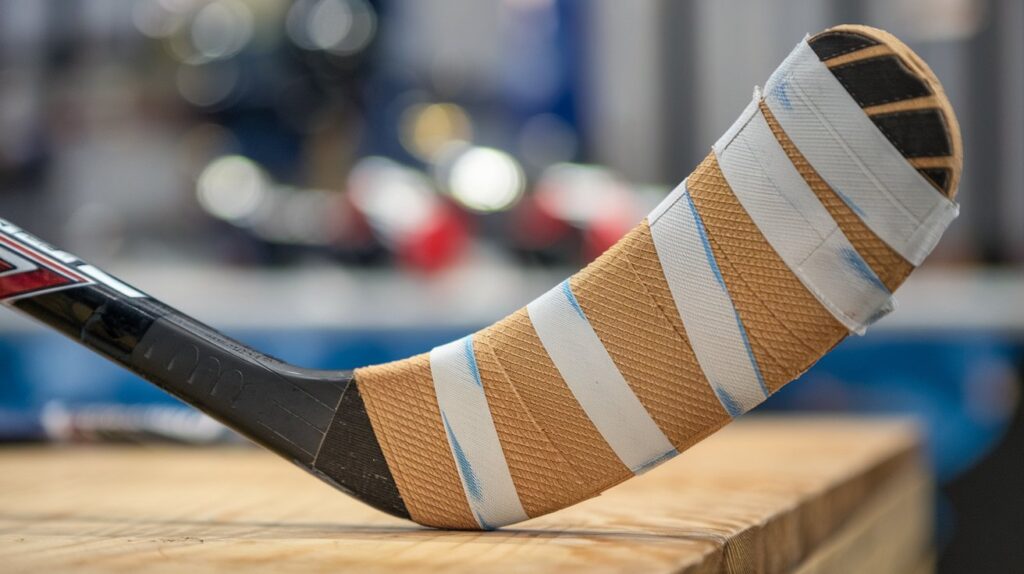
As players develop their skills, they often experiment with different hockey stick taping styles for the top end. The candy cane method involves wrapping tape with two colors in an alternating spiral pattern, which not only looks distinctive but helps players maintain consistent hand placement through visual reference. This technique became increasingly popular among United States college hockey players during the 2025-2026 season.
Another advanced style is the oversized knob, preferred by defensemen who need extra leverage for poke checks and stick lifts. This involves building a larger knob, sometimes 2.5 to 3 inches in diameter, using additional layers of tape. Conversely, some skilled forwards prefer a minimal knob barely larger than the shaft diameter, prioritizing quick hand movements and stick rotations over maximum grip security.
How to Add Grip Ribs to Your Hockey Stick Handle
Adding grip ribs to your hockey stick handle enhances control beyond just the knob area. This technique involves wrapping tape around the shaft at regular intervals below the knob, creating raised ridges that your glove grips. Professional players often place 3-5 grip ribs spaced about 1-2 inches apart, starting immediately below the knob and extending down 6-8 inches.
To create effective grip ribs, wrap the tape around the shaft 2-3 times at each location, ensuring each rib is uniform in thickness. The key is maintaining consistent spacing and height for each rib so your hand naturally finds familiar reference points during play. Some players prefer a continuous spiral grip that covers the entire top portion of their stick, while others use strategic rib placement that corresponds to their most common hand positions during stickhandling and shooting.
How Professional Players Tape Their Stick Tops
Understanding how pros tape a hockey stick provides valuable insight for players at all levels. NHL players in 2026 display remarkable variety in their top-end taping preferences, with some opting for minimal tape jobs while others create elaborate grip systems. Colorado Avalanche and Boston Bruins equipment managers report that most professional players change their top tape every 2-3 games to maintain optimal grip and freshness.
Many professional players use a combination knob approach, creating a substantial knob with 8-12 wraps, then adding a secondary smaller knob about 2 inches below the first. This double-knob system provides reference points for both standard play and extended reach situations. The specific taping pattern often reflects a player’s junior hockey experience, with Canadian-trained players typically using different techniques than those who developed through United States youth hockey programs.
Step-by-Step Guide for Beginners
Learning how to tape the top of a hockey stick for beginners doesn’t need to be complicated. Start with your stick standing upright and secure. Take your roll of hockey tape and place the end directly on top of the end cap, leaving about an inch of tape extending beyond the top. Fold this extension down over the sides and press it firmly against the shaft to anchor your tape job.
Begin wrapping the tape around the butt end, overlapping each wrap by about half the tape width. Maintain steady tension throughout the process, firm enough to create a solid knob but not so tight that the tape stretches and becomes thin. After 6-8 wraps moving upward, reverse direction and wrap back down over your initial wraps. When you reach your desired knob size, tear or cut the tape, press the end firmly against the shaft, and smooth any rough edges with your fingers.
Determining the Right Number of Tape Layers
A common question is how many layers of tape on hockey stick tops provide optimal performance. The answer depends on personal preference, hand size, and playing style, but most players use between 8-15 wraps total for their knob. Youth players and those with smaller hands typically benefit from 6-10 wraps, creating a modest knob that doesn’t interfere with stick handling.
Adult players and those seeking maximum grip security often use 12-18 wraps, building a more substantial knob. The layers of tape should create a knob that fills the space in your palm when gripping the stick naturally. According to equipment surveys from USA Hockey in 2025, the average player uses approximately 11 wraps for their top knob, though this varies significantly based on regional preferences and coaching philosophies across different United States hockey programs.
Best Tape Options for Hockey Stick Handles
Selecting the best tape for hockey stick handles impacts both performance and durability. Standard cloth hockey tape remains the most popular choice, offering excellent grip, durability, and affordability at prices ranging from $2-4 per roll in United States sporting goods stores in 2026. Premium cloth tapes with enhanced adhesive backing provide superior stick even in cold rink conditions where cheaper tapes may lose tackiness.
Specialized hockey stick tape products have emerged in recent years, including cushioned tape with foam backing for players seeking shock absorption, and rubberized grip tape borrowed from baseball and tennis that provides exceptional traction. Colored and patterned tapes allow for personalization while maintaining performance characteristics. Many elite players mix tape types, using standard cloth tape for the knob base and finishing with premium grip tape on the outer layers where their hand makes direct contact.
Common Mistakes When Taping Stick Tops
Even experienced players make errors when learning how to tape the top of a hockey stick properly. The most common mistake is wrapping tape too loosely, which creates a soft, compressible knob that changes shape during use and provides inconsistent feel. Conversely, wrapping too tightly stretches the tape thin, reducing durability and creating a hard, uncomfortable knob that causes hand fatigue and reduces feel.
Another frequent error is creating an asymmetrical or lopsided knob by not maintaining consistent wrap overlap and tension. This results in an irregular shape that doesn’t sit properly in your palm and can cause blisters during extended play. Many beginners also make their knobs either too large, which interferes with quick hand movements, or too small, which doesn’t provide adequate grip security. The ideal knob should feel like a natural extension of your hand rather than an obstruction or barely-there bump.
Maintaining Your Hockey Stick Tape Job
Understanding proper maintenance extends the life of your hockey stick tape job and ensures consistent performance. Most players need to retape their stick tops every 4-8 ice sessions depending on usage intensity and personal preference. Signs that it’s time to retape include visible wear, tape loosening from the shaft, the knob losing its shape, or reduced grip effectiveness during stick handling.
Between taping sessions, inspect your tape job for loose edges and press them back down to prevent further unraveling. Some players apply a light coating of stick wax or tape adhesive spray to extend grip life, though this can make the surface sticky and attract dust. Store your stick in a dry area away from extreme temperatures, as heat can soften tape adhesive while excessive cold can make tape brittle and prone to cracking.
Customizing Your Tape Job for Playing Position
Different positions benefit from specific hockey stick handle grip configurations. Forwards who prioritize quick release shots and rapid stick handling often prefer smaller, streamlined knobs with minimal grip ribs that allow fast hand repositioning. This style, common among United States-based NHL forwards in 2026, sacrifices some grip security for maximum maneuverability and shot speed.
Defensemen typically favor larger hockey stick knobs with extensive grip rib systems that provide leverage for physical play, poke checks, and point shots. The additional grip surface helps maintain stick control during board battles and one-handed plays. Goaltenders use specialized paddle knobs that are significantly larger and differently shaped than player knobs, designed to prevent the stick from sliding through their blocker hand during saves and puck handling behind the net.
Related video about how to tape the top of a hockey stick
This video complements the article information with a practical visual demonstration.
Frequently Asked Questions
Why tape the top of a hockey stick?
Taping the top of a hockey stick creates a knob that prevents the stick from slipping out of your hands during play. This knob provides a physical barrier for your top hand, improves grip control, and reduces hand fatigue during games and practices. The tape also protects the end cap from damage and allows players to customize their grip texture and size based on personal preference and playing style. Professional and amateur players throughout United States hockey programs consider proper top-end taping essential for optimal stick control and performance.
How do pros tape a hockey stick top?
Professional players tape their hockey stick tops with techniques ranging from minimal to elaborate depending on personal preference. Most NHL players in 2026 create knobs using 8-15 wraps of premium cloth tape, often adding grip ribs below the knob for enhanced control. Common pro techniques include the double-knob method, candy cane two-color wrapping, and strategic grip rib placement. Professionals typically retape their stick tops every 2-3 games to maintain consistent feel and performance, and many use specialized grip-enhanced tapes not commonly available to recreational players.
How many layers of tape should be on a hockey stick knob?
The optimal number of tape layers for a hockey stick knob ranges from 8-15 wraps for most players, though this varies based on hand size and personal preference. Youth players and those with smaller hands typically use 6-10 wraps, while adult players seeking maximum grip security often use 12-18 wraps. The key is creating a knob that comfortably fills your palm without being so large that it interferes with stick handling or so small that it provides inadequate grip security. According to 2025 USA Hockey surveys, the average player uses approximately 11 wraps for their top knob.
What is the best tape for hockey stick handles?
Standard cloth hockey tape remains the best overall choice for most players, offering excellent grip, durability, and value at $2-4 per roll in 2026. Premium options include grip-enhanced cloth tape with textured surfaces, cushioned tape with foam backing for shock absorption, and specialized butt end tape that’s thicker than standard blade tape. Many elite players use rubberized grip tape on outer layers for maximum traction where their hand contacts the knob. The best tape for you depends on your budget, playing frequency, and grip preference, though standard cloth tape from reputable brands performs well for players at all levels.
How often should you retape the top of your hockey stick?
Most players should retape the top of their hockey stick every 4-8 ice sessions depending on usage intensity and personal preference. Professional players typically retape every 2-3 games to maintain optimal grip and fresh feel. Signs that indicate it’s time to retape include visible wear on the tape surface, loosening from the shaft, the knob losing its shape, or reduced grip effectiveness during stick handling. Players who practice or play multiple times per week may need to retape weekly, while recreational players with less frequent ice time can often go 2-3 weeks between tape jobs.
Can you tape a hockey stick with two colors?
Yes, taping a hockey stick with two colors is a popular technique called the candy cane method. This involves alternating between two tape colors in a spiral pattern as you build your knob, creating a distinctive striped appearance. Beyond aesthetics, two-color taping provides a visual reference point that helps players maintain consistent hand placement. To achieve this look, start with one color for 2-3 wraps, then switch to the second color for 2-3 wraps, alternating throughout the knob construction. This style became increasingly popular among United States college hockey players during the 2025-2026 season and works with any color combination.
| Taping Aspect | Recommended Approach | Key Benefit |
|---|---|---|
| Knob Size | 8-15 wraps, 1-2 inches length | Prevents slippage while maintaining maneuverability |
| Tape Type | Standard cloth or grip-enhanced tape | Optimal grip and durability at reasonable cost |
| Grip Ribs | 3-5 ribs spaced 1-2 inches apart | Enhanced control and hand positioning reference |
| Retaping Frequency | Every 4-8 ice sessions or when worn | Maintains consistent feel and maximum performance |
| Wrapping Tension | Firm but not stretched thin | Creates durable, comfortable knob with proper shape |